Friday, December 12, 2014

Making Something Out of Nothing

When my kids were younger, one of my favorite books to read to them was Simms Taback's story, "Joseph Had a Little Overcoat."  The story begins with Joseph having an overcoat; once it is worn out a bit, Joseph "upcycles" it into something new. He continues upcycling it until there is nothing left, or so it seems.

Although I have long given the book away to the kids former nursery school, this story has stayed with me as they have grown, leaving me to wonder, can I too make something from nothing?

Most of the smaller yarn bits came from chemo caps crocheted
earlier this year; the longer bits came from the 20 scarves I
crocheted for local donation.
Apparently I can!

This year I decided to save the majority of the yarn bits I snipped off my projects once I was done securely weaving in the ends, Any yarn scraps from 4 inches to 24" qualified for this endeavor. Some of the bits I tied together using the "Magic Knot" method, some I joined together using the "Russian" join method, while others were done in the more traditional fashion.

The result is the cap pictured on the right, which my family knows I affectionately call my "Scrap Cap." After nearly a year, it is almost complete!  I really love how colorful it is!  Once the cap is done I plan on donating it, which brings me back the story of Joseph. Can I make something out of nothing? Yes. And even when I no longer have the hat, I will still have the story of it. ;)

Thursday, December 11, 2014

Get Your KixX, inspired by Route 66

I am super pleased  to announce the release of a new pattern!  KixX!  ... a 2014 Blue Ribbon winning design!
Get your KixX inspired by Route 66!

This KixX boot cuff pattern was inspired while I was traveling with my kids in the mid-west two summers ago!  I just loved the big blue sky, the open road, and the boots (and there were boots seemingly everywhere!) ...


The pattern calls for using two hanks of Trendsetter's "Twiggy" yarn, but you can use whatever equivalent yarn weight you'd like.  The Twiggy yarn is a linen based yarn which will soften a bit after each laundering, and will hold up nicely!  The pattern even includes instructions on how to lengthen the cuffs in case you have taller boots. Plus, you can bling your KixX out by adding some really decorative beads!

At the moment the only place the pattern is available is at Ravelry:  http://www.ravelry.com/patterns/library/kixx  Pattern retails for $2.50 us.

Monday, October 13, 2014

Fond Memories of The 2003 CYCA CIP Class

Arnetta Kenney teaching the CYCA's CIP for Crochet
at FIT in NYC back in 2003.
Have you ever attended an event or a class that created memories that, even years later, still brings you smiles?  I have.  As I was looking through some of my old photos, I came across some I had taken during one of those magical times...

In 2003, Grace and I booked a hotel room in New York City for an extended weekend to attend the Craft Yarn Council'' CIP (Certified Instructors Program) for Crochet at FIT (Fashion Institute of Technology) in New York City.  I look back and think of this as an amazing experience!

 The 3-day course started on a Friday evening, went for eight hours on Saturday, and then concluded early Sunday afternoon.  (Even with homework assigned, Grace and I still found time to go out to dinner and catch a movie!)  Our class was taught by the ever-wonderful (and singing!) Arnetta Kenney,  If I recall correctly, it was the first CYCA CIP Crochet Class ever held at FIT!  I asked Mary Colluci, the CYCA's Executive Director what she remembered about this  class: "I recall the wonderful enthusiasm and energy in the room. Of course, Arnetta can do that to a class."
Look who stopped by! Mary Colluci,
 the CYCA's Executive Director

I had decided to attend the class rather than take the Correspondence Program because I found the completion of the class work quicker since it included (and still does!) Levels I and II, and I liked that by taking the class at FIT I could also earn some Continuing Education Units. Mary adds, "There's a set curriculum for the onsite CIP class but so much more is exchanged because of the interaction between students, the questions they ask and the expertise they share. It's a wonderful experience."  She is so right!

  Maybe you'll recognize some of the students from that class?
A most fun class!  CYCA's First-ever CIP for Crochet class at FIT in 2003.


Grace, Arnetta, Barbara and me.
Where Are They Now? What happened to some of the students once the class concluded?  Melanie (standing next to me in the photo above) went on to found the Tallahassee Chapter of the CGOA, and reports she is currently looking into starting another Chapter in the Thomasville, GA, area.  If she looks a little familiar, that means you've been checking out photos of various CGOA ChainLink Conferences where she has modeled many beautiful creations!

Grace, standing behind me in the photo on the right, went on to become the Happily Hooked on Crocheting Club's President (we joke "for life," but then again, we were serious! lol) all while keeping up with her beautiful grand-daughters..

Barbara went on to help organize the Hyperbolic Crochet Coral Reef project that went to the Smithsonian (and other museums!), was a Guest Speaker at the Museum of Arts and Design, and now works for the Craft Yarn Council as a Master Teacher for the Crochet Instructors Program! She also taught a Modular Crochet Workshop for The HHCC.  Did I mention (prior to the CIP class)  she also Founded the New York City Crochet Guild?  You can check out Barbara's website at www.playingwithstring.com.

During the class "Show'N Tell" session, students such as Von
got to talk about the different crochet techniques we enjoy.
Von (pictured on the left wearing red), started teaching more, including being taped for a local cable show, self-published crochet patterns with Bead Biz, Twisted Sistah Fiber &Beads, Tess Designer Yarns, and Creative Yarn Source. Currently she is expecting her Crochet Maille to be published with Mainly Crochet. She has written a good number of articles for the CGOA's ChainLink Newsletter, and has volunteered many times for the (then) NYC Knit Out and Crochet Too events.  She even substituted for Arnetta once in her "Crochet For Pleasure" class.  Prior to attending the CIP class, Von founded the group Von’s Crochet Cyberspace, which at one time had over 500 members. Today you can find her at www.voncrobead.com and
www.vcbtheblog.com
Hmmm, www.CrochetWithDee.com was on the blackboard... 

If you are interested in teaching and you would like to learn more about the Certification Instructors Program that the Craft Yarn Council offers for both crochet and knit, visit http://craftyarncouncil.com/?q=teach.html
I also liked (and still do!), that regardless if you take the 3-day class or the Correspondence Course, Crochet Guild of America members (and the Knitting Guild members too) are offered a little discount!

We had some free time in the class; I taught everyone how
to finger weave. Rosalie is helping another student with the
finger placement.
In the time since I've completed the CYCA CIP program and getting my Certificates for Levels I and II, I've gone on to teaching in several states, teaching at several of the CGOA ChainLink Conferences, having some patterns published, becoming a CGOA Professional Member and Mentor, blogging, writing articles for the ChainLink newsletter, and more!  So what is next? I'm thinking once things settle down here that it is time for me to sign up for Level III.

Note: If you attended this CYCA CIP for Crochet Class and would like to be added to the "Where are they now," please contact me. 

Tuesday, October 7, 2014

Book Review: Tunisian Crochet For Baby

Title: Tunisian Crochet For Baby
Author: Sharon Silverman
Year Published: 2014; printed in USA

Dee's Rating: 10 Hooks out of 10

Remember that adorable baby blanket I crocheted for my nephew-to-be? (We're expecting his arrival any day now!) The pattern was by Sharon Silverman, which I enjoyed working on greatly.  Shortly after I completed that project I was asked if I would review her newest book, Tunisian Crochet For Baby, I was tickled, well, yes, one could say I was tickled pink!

In flipping through the digital pages I was instantly pleased -- this book has some really great projects for crocheters wanting to crochet something special for baby while perhaps learning something new in Tunisian such as entrelac, cables, even Tunisian in the Round!  The projects range in skill level from Easy to Experienced, so there is plenty for the beginner with some crochet experience to grow their skill with, and projects to give the Experienced crocheter some challenge.

Something unique about the projects featured in this book I'd like to point out: some of the projects can grow with the tike!  See that Checkerboard Blanket pictured on the top right? It is now on my To Make List for my Mahgurl.  That's right, for my grown babygurl who is all set to graduate high school come summer! Wouldn't it look great in the school colors of the college she'll be attending?  I think so too!

And then there's the Nursery Box. If I had crocheted something like that for Mahgurl when she was a tot, it too would have grown with her. From holding little baby treasures, to crayons, to Barbies, to hair accessories, to whatever she'd need it to store in her dorm room.

In the sixteen project-sections of the book, Sharon offers 23 adorable patterns for the bundles of joy in our lives, with the sizing focus on newborn to 12-months. The projects are shown in a variety of colors from traditional to non-traditional, with clear and crisp photography (this is quite nice if you utilize the zooming option with digital books!).  Even the How To's are photographed very well, with good sized photos for clearer understanding.  Even sweeter -- the projects are complete with accompanying stitch charts. Sharon also included refreshers for both Traditional and Tunisian crochet, and a Beyond the Basics section which is great for newbie and "a bit rusty" crocheters! Because of everything I just mentioned, I give this book the rating of Ten Hooks!

Wednesday, October 1, 2014

Too Nice to Use??!!

When we crochet, knit, craft with someone in mind, we do so as a symbol of our love, of our appreciation, of our friendship.  As each stitch is crafted, that love is poured into it.  So yes, it does bother us, well, at least it bothers me, when I am told upon gifting this item, that it is "Too nice to use."

Really?


I've been crazy-busy lately, so has Mr Dee.

I recently purchased this "new to me" super yummy yarn that was just more than ready to grow up into a hat for Mr Dee,  You see, fall is upon us. And with our neighborhood losing two beloved neighbors this year, this means Mr Dee has been busy taking care of their lawn-needs while the families grieve and work out all of the probate stuff.  And you know what comes after fall.  Uhhuh. Snow weather.

And Mr Dee's regular, store bought hat, is looking rather "ratty" if I do say so myself.  I grabbed my hook and set to work, sneaking in stitches here and there until the project is complete, and the tails are securely woven in.
Mr Dee gets a new crocheted hat. I get a new yarn to love.

I present him his new hat. He thanks me, looks over my stitches and exclaims, "Wow, your stitches are so uniform it looks like a machine made this!" (Yes, we all know that machines cannot crochet. Knit yes. Crochet no.) He tries it on. It fits him wonderfully. He checks it out in a mirror and then asks me why I crocheted him a new hat.  I explain it to him. He replies, "It is too nice to use. I'll ruin it!"

To which I reply, "Ruin it then!  I can always buy more yarn and make you another!"

Of course we all know that if he doesn't wear it I'll simply have to throttle him. You know, out of the name of love.

Note: No husbands were iharmed as a result of this project.

Friday, September 5, 2014

Jolly Joining

There I was. Busy crocheting my third scarf (and hat set) for the 2014 60 Scarves in 60 Days Challenge when I decided I didn't want the scarf to be a scarf.  No, I decided I wanted it to be a cowl. (Yes, cowls count in the Challenge).

Unfortunately, as I had decided this, I looked at the beginning tail -- the tail was not long enough to utilize for sewing the "scarf" ends together. Groan. This would mean I'd need to cut yarn off my skein, sew the crocheted fabric together, and then securely bury the ends in... Shouldn't be a big deal, right?

Have I ever professed at how much I don't like sewing in my ends? I know I'm not alone in this; we'd much rather crochet than have to stop and bury those ends! For the most part, I don't mind sewing in a few, but when it comes to sewing in "unnecessary" ends because I hadn't planned ahead, well, those I loathe. It feels like punishment! (lol)  So I started thinking.

And thought some more.
Jolly Joining crochet edges with live stitches.

Made some more stitches.

Thought some more.

And then the light bulb went off.  "OMG! Why has no one shown me how to do this before??!!  I'm sure someone else has thought of this!!"

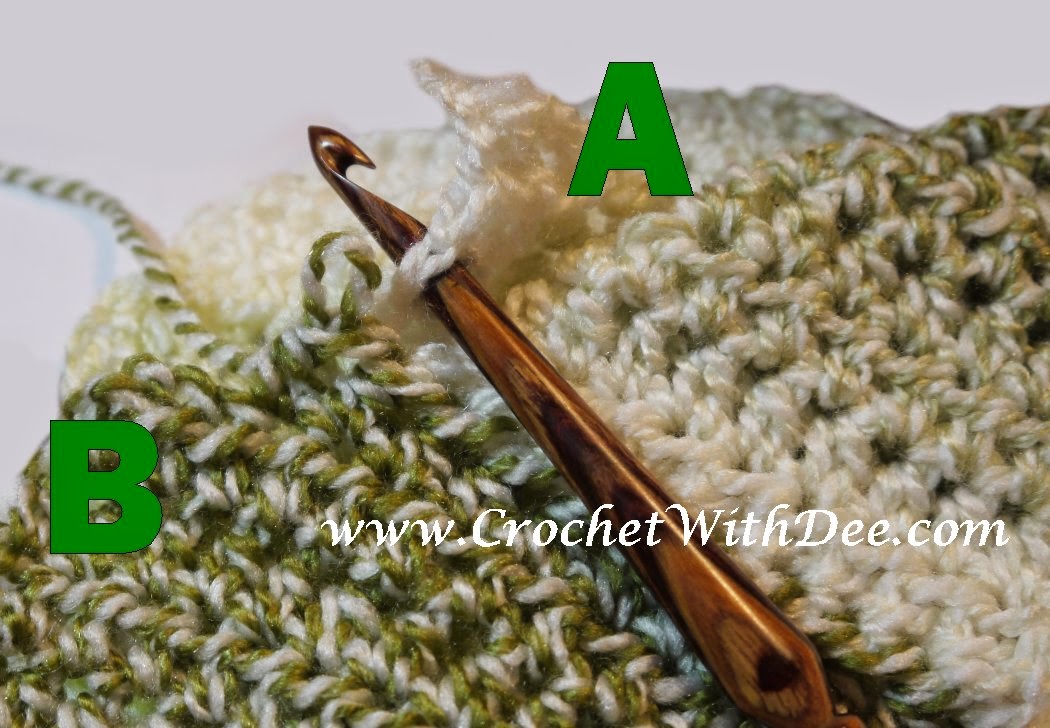
Jolly Joining: I made my last turning chains, aligned the work where I wanted to join it, removed the hook from the live loop (see 'B' in image), then inserted my hook (from front to back; see 'A' in image) into the fabric I wanted to join to, then I replaced the live loop back onto my hook and pulled it through. Next, I made my stitch (in this case I was working with hdc sts), repeating the process of pulling the live loop through the opposite fabric before making each stitch I needed for that last row until the join was complete.

And you know what? I love it! No additional sewing required! No additional ends to bury! On the working side (aka the "back side") there are "slashes" that look like it had been hand-sewn.  But on the front side (see image below) it looks seemless!!  And, bonus!, it is flat to the touch!  Squee!!
Jolly Joining leaves a clean, seemless, and flat finish!

Mr Dee came over and asked why I was so happy. When I explained the process to him he replied, "Sounds to me you found the perfect jolly join technique."  He's so right! I can't wait to utilize this joining technique more!


sidenote: If you know of someone else using this join technique, and/or know of its proper name, please let me know as I'd love to give proper credit.  For now, I'm going to give Mr Dee the name credit.  :)

Yarn in photo: Knitting Fever Candy Cane
Crochet Hook by Dyak.

Monday, September 1, 2014

11th Annual 60 Scarves in 60 Days Challenge!

2014 is our ELEVENTH Annual “60 Scarves in 60 Days Challengethat had originated here on my blog, www.CrochetingWithDee.com. With so many people wanting to participate it became easier to track the participants and their scarves over on Ravelry, http://www.ravelry.com/groups/60-scarves-in-60-days-challenge.


How the Challenge works:
    1. Crochet, knit, or weave a scarf (or more) for charity. You can use a pattern (give credit to the designer if that’s what the pattern calls for!), learn a new stitch, or create your own pattern. The scarf MUST be made by hand!

    2. Pledge it for a local charity near YOU; no need to ship! Check with your local homeless shelters, Salvation Armys, religious institutions, and schools to find a home for your scarf/scarves.

    3. To have your scarf count towards the goal, tell us about it on our Ravelry group; if you upload an image label it ”2014 Scarf for 60 Day Challenge.” Or post about it on your blog and post the link to the group.  You can participate as an individual, or as part of a group or Chapter.

    4. The scarf/scarves must be created by hand between September 1st and November 30th, 2014, midnight, eastern time, to count. (Yes, we know this is really 90 days, but we’re keeping the name of 60 days)

    5. Any skill level, age and gender can participate! Spread the word!
… and no, you do not need to crochet, knit or weave 60 scarves in order to be a participant! That is, unless you want to! All that is required is crafting one scarf by hand from September 1st through November 30th and then posting about it to the group. Your scarf - or scarves - are then added in with everyone else’s. Much like adding drops to a bucket; eventually it will fill up!  <3 comment-3--="">

Join in on the fun while helping YOUR local community!