Friday, December 12, 2014

Making Something Out of Nothing

When my kids were younger, one of my favorite books to read to them was Simms Taback's story, "Joseph Had a Little Overcoat."  The story begins with Joseph having an overcoat; once it is worn out a bit, Joseph "upcycles" it into something new. He continues upcycling it until there is nothing left, or so it seems.

Although I have long given the book away to the kids former nursery school, this story has stayed with me as they have grown, leaving me to wonder, can I too make something from nothing?

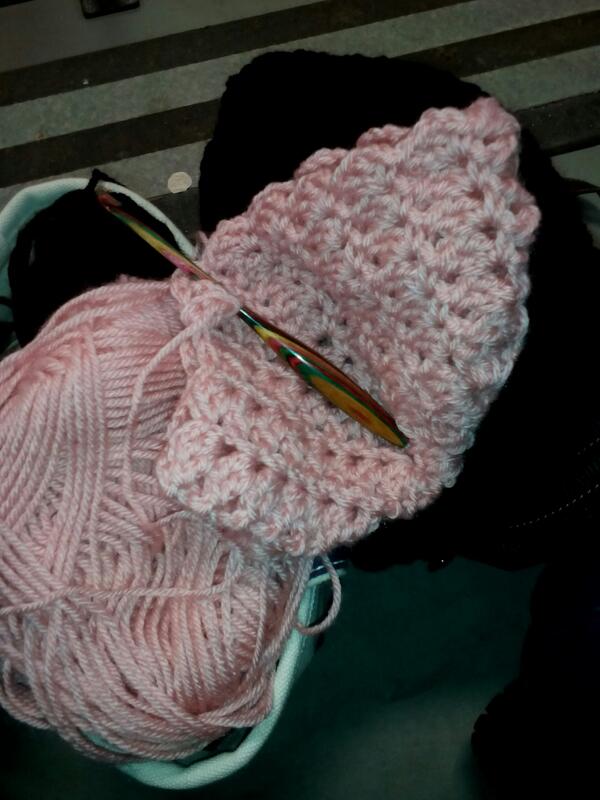
Most of the smaller yarn bits came from chemo caps crocheted
earlier this year; the longer bits came from the 20 scarves I
crocheted for local donation.
Apparently I can!

This year I decided to save the majority of the yarn bits I snipped off my projects once I was done securely weaving in the ends, Any yarn scraps from 4 inches to 24" qualified for this endeavor. Some of the bits I tied together using the "Magic Knot" method, some I joined together using the "Russian" join method, while others were done in the more traditional fashion.

The result is the cap pictured on the right, which my family knows I affectionately call my "Scrap Cap." After nearly a year, it is almost complete!  I really love how colorful it is!  Once the cap is done I plan on donating it, which brings me back the story of Joseph. Can I make something out of nothing? Yes. And even when I no longer have the hat, I will still have the story of it. ;)

Thursday, December 11, 2014

Get Your KixX, inspired by Route 66

I am super pleased  to announce the release of a new pattern!  KixX!  ... a 2014 Blue Ribbon winning design!
Get your KixX inspired by Route 66!

This KixX boot cuff pattern was inspired while I was traveling with my kids in the mid-west two summers ago!  I just loved the big blue sky, the open road, and the boots (and there were boots seemingly everywhere!) ...


The pattern calls for using two hanks of Trendsetter's "Twiggy" yarn, but you can use whatever equivalent yarn weight you'd like.  The Twiggy yarn is a linen based yarn which will soften a bit after each laundering, and will hold up nicely!  The pattern even includes instructions on how to lengthen the cuffs in case you have taller boots. Plus, you can bling your KixX out by adding some really decorative beads!

At the moment the only place the pattern is available is at Ravelry:  http://www.ravelry.com/patterns/library/kixx  Pattern retails for $2.50 us.

Monday, October 13, 2014

Fond Memories of The 2003 CYCA CIP Class

Arnetta Kenney teaching the CYCA's CIP for Crochet
at FIT in NYC back in 2003.
Have you ever attended an event or a class that created memories that, even years later, still brings you smiles?  I have.  As I was looking through some of my old photos, I came across some I had taken during one of those magical times...

In 2003, Grace and I booked a hotel room in New York City for an extended weekend to attend the Craft Yarn Council'' CIP (Certified Instructors Program) for Crochet at FIT (Fashion Institute of Technology) in New York City.  I look back and think of this as an amazing experience!

 The 3-day course started on a Friday evening, went for eight hours on Saturday, and then concluded early Sunday afternoon.  (Even with homework assigned, Grace and I still found time to go out to dinner and catch a movie!)  Our class was taught by the ever-wonderful (and singing!) Arnetta Kenney,  If I recall correctly, it was the first CYCA CIP Crochet Class ever held at FIT!  I asked Mary Colluci, the CYCA's Executive Director what she remembered about this  class: "I recall the wonderful enthusiasm and energy in the room. Of course, Arnetta can do that to a class."
Look who stopped by! Mary Colluci,
 the CYCA's Executive Director

I had decided to attend the class rather than take the Correspondence Program because I found the completion of the class work quicker since it included (and still does!) Levels I and II, and I liked that by taking the class at FIT I could also earn some Continuing Education Units. Mary adds, "There's a set curriculum for the onsite CIP class but so much more is exchanged because of the interaction between students, the questions they ask and the expertise they share. It's a wonderful experience."  She is so right!

  Maybe you'll recognize some of the students from that class?
A most fun class!  CYCA's First-ever CIP for Crochet class at FIT in 2003.


Grace, Arnetta, Barbara and me.
Where Are They Now? What happened to some of the students once the class concluded?  Melanie (standing next to me in the photo above) went on to found the Tallahassee Chapter of the CGOA, and reports she is currently looking into starting another Chapter in the Thomasville, GA, area.  If she looks a little familiar, that means you've been checking out photos of various CGOA ChainLink Conferences where she has modeled many beautiful creations!

Grace, standing behind me in the photo on the right, went on to become the Happily Hooked on Crocheting Club's President (we joke "for life," but then again, we were serious! lol) all while keeping up with her beautiful grand-daughters..

Barbara went on to help organize the Hyperbolic Crochet Coral Reef project that went to the Smithsonian (and other museums!), was a Guest Speaker at the Museum of Arts and Design, and now works for the Craft Yarn Council as a Master Teacher for the Crochet Instructors Program! She also taught a Modular Crochet Workshop for The HHCC.  Did I mention (prior to the CIP class)  she also Founded the New York City Crochet Guild?  You can check out Barbara's website at www.playingwithstring.com.

During the class "Show'N Tell" session, students such as Von
got to talk about the different crochet techniques we enjoy.
Von (pictured on the left wearing red), started teaching more, including being taped for a local cable show, self-published crochet patterns with Bead Biz, Twisted Sistah Fiber &Beads, Tess Designer Yarns, and Creative Yarn Source. Currently she is expecting her Crochet Maille to be published with Mainly Crochet. She has written a good number of articles for the CGOA's ChainLink Newsletter, and has volunteered many times for the (then) NYC Knit Out and Crochet Too events.  She even substituted for Arnetta once in her "Crochet For Pleasure" class.  Prior to attending the CIP class, Von founded the group Von’s Crochet Cyberspace, which at one time had over 500 members. Today you can find her at www.voncrobead.com and
www.vcbtheblog.com
Hmmm, www.CrochetWithDee.com was on the blackboard... 

If you are interested in teaching and you would like to learn more about the Certification Instructors Program that the Craft Yarn Council offers for both crochet and knit, visit http://craftyarncouncil.com/?q=teach.html
I also liked (and still do!), that regardless if you take the 3-day class or the Correspondence Course, Crochet Guild of America members (and the Knitting Guild members too) are offered a little discount!

We had some free time in the class; I taught everyone how
to finger weave. Rosalie is helping another student with the
finger placement.
In the time since I've completed the CYCA CIP program and getting my Certificates for Levels I and II, I've gone on to teaching in several states, teaching at several of the CGOA ChainLink Conferences, having some patterns published, becoming a CGOA Professional Member and Mentor, blogging, writing articles for the ChainLink newsletter, and more!  So what is next? I'm thinking once things settle down here that it is time for me to sign up for Level III.

Note: If you attended this CYCA CIP for Crochet Class and would like to be added to the "Where are they now," please contact me. 

Tuesday, October 7, 2014

Book Review: Tunisian Crochet For Baby

Title: Tunisian Crochet For Baby
Author: Sharon Silverman
Year Published: 2014; printed in USA

Dee's Rating: 10 Hooks out of 10

Remember that adorable baby blanket I crocheted for my nephew-to-be? (We're expecting his arrival any day now!) The pattern was by Sharon Silverman, which I enjoyed working on greatly.  Shortly after I completed that project I was asked if I would review her newest book, Tunisian Crochet For Baby, I was tickled, well, yes, one could say I was tickled pink!

In flipping through the digital pages I was instantly pleased -- this book has some really great projects for crocheters wanting to crochet something special for baby while perhaps learning something new in Tunisian such as entrelac, cables, even Tunisian in the Round!  The projects range in skill level from Easy to Experienced, so there is plenty for the beginner with some crochet experience to grow their skill with, and projects to give the Experienced crocheter some challenge.

Something unique about the projects featured in this book I'd like to point out: some of the projects can grow with the tike!  See that Checkerboard Blanket pictured on the top right? It is now on my To Make List for my Mahgurl.  That's right, for my grown babygurl who is all set to graduate high school come summer! Wouldn't it look great in the school colors of the college she'll be attending?  I think so too!

And then there's the Nursery Box. If I had crocheted something like that for Mahgurl when she was a tot, it too would have grown with her. From holding little baby treasures, to crayons, to Barbies, to hair accessories, to whatever she'd need it to store in her dorm room.

In the sixteen project-sections of the book, Sharon offers 23 adorable patterns for the bundles of joy in our lives, with the sizing focus on newborn to 12-months. The projects are shown in a variety of colors from traditional to non-traditional, with clear and crisp photography (this is quite nice if you utilize the zooming option with digital books!).  Even the How To's are photographed very well, with good sized photos for clearer understanding.  Even sweeter -- the projects are complete with accompanying stitch charts. Sharon also included refreshers for both Traditional and Tunisian crochet, and a Beyond the Basics section which is great for newbie and "a bit rusty" crocheters! Because of everything I just mentioned, I give this book the rating of Ten Hooks!

Wednesday, October 1, 2014

Too Nice to Use??!!

When we crochet, knit, craft with someone in mind, we do so as a symbol of our love, of our appreciation, of our friendship.  As each stitch is crafted, that love is poured into it.  So yes, it does bother us, well, at least it bothers me, when I am told upon gifting this item, that it is "Too nice to use."

Really?


I've been crazy-busy lately, so has Mr Dee.

I recently purchased this "new to me" super yummy yarn that was just more than ready to grow up into a hat for Mr Dee,  You see, fall is upon us. And with our neighborhood losing two beloved neighbors this year, this means Mr Dee has been busy taking care of their lawn-needs while the families grieve and work out all of the probate stuff.  And you know what comes after fall.  Uhhuh. Snow weather.

And Mr Dee's regular, store bought hat, is looking rather "ratty" if I do say so myself.  I grabbed my hook and set to work, sneaking in stitches here and there until the project is complete, and the tails are securely woven in.
Mr Dee gets a new crocheted hat. I get a new yarn to love.

I present him his new hat. He thanks me, looks over my stitches and exclaims, "Wow, your stitches are so uniform it looks like a machine made this!" (Yes, we all know that machines cannot crochet. Knit yes. Crochet no.) He tries it on. It fits him wonderfully. He checks it out in a mirror and then asks me why I crocheted him a new hat.  I explain it to him. He replies, "It is too nice to use. I'll ruin it!"

To which I reply, "Ruin it then!  I can always buy more yarn and make you another!"

Of course we all know that if he doesn't wear it I'll simply have to throttle him. You know, out of the name of love.

Note: No husbands were iharmed as a result of this project.

Friday, September 5, 2014

Jolly Joining

There I was. Busy crocheting my third scarf (and hat set) for the 2014 60 Scarves in 60 Days Challenge when I decided I didn't want the scarf to be a scarf.  No, I decided I wanted it to be a cowl. (Yes, cowls count in the Challenge).

Unfortunately, as I had decided this, I looked at the beginning tail -- the tail was not long enough to utilize for sewing the "scarf" ends together. Groan. This would mean I'd need to cut yarn off my skein, sew the crocheted fabric together, and then securely bury the ends in... Shouldn't be a big deal, right?

Have I ever professed at how much I don't like sewing in my ends? I know I'm not alone in this; we'd much rather crochet than have to stop and bury those ends! For the most part, I don't mind sewing in a few, but when it comes to sewing in "unnecessary" ends because I hadn't planned ahead, well, those I loathe. It feels like punishment! (lol)  So I started thinking.

And thought some more.
Jolly Joining crochet edges with live stitches.

Made some more stitches.

Thought some more.

And then the light bulb went off.  "OMG! Why has no one shown me how to do this before??!!  I'm sure someone else has thought of this!!"

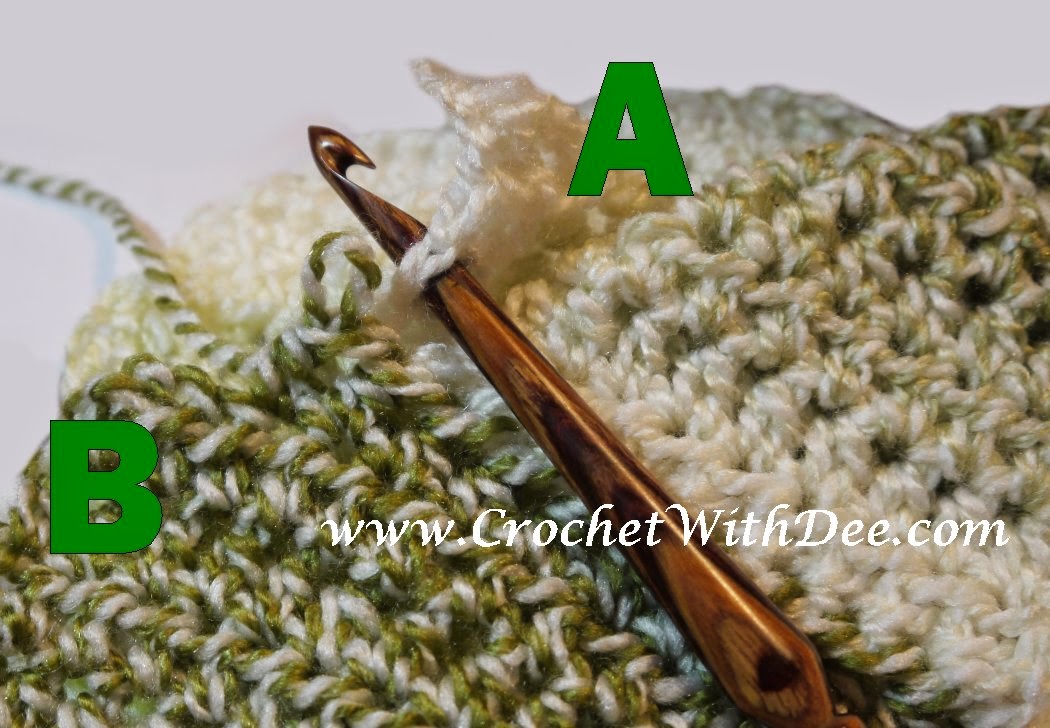
Jolly Joining: I made my last turning chains, aligned the work where I wanted to join it, removed the hook from the live loop (see 'B' in image), then inserted my hook (from front to back; see 'A' in image) into the fabric I wanted to join to, then I replaced the live loop back onto my hook and pulled it through. Next, I made my stitch (in this case I was working with hdc sts), repeating the process of pulling the live loop through the opposite fabric before making each stitch I needed for that last row until the join was complete.

And you know what? I love it! No additional sewing required! No additional ends to bury! On the working side (aka the "back side") there are "slashes" that look like it had been hand-sewn.  But on the front side (see image below) it looks seemless!!  And, bonus!, it is flat to the touch!  Squee!!
Jolly Joining leaves a clean, seemless, and flat finish!

Mr Dee came over and asked why I was so happy. When I explained the process to him he replied, "Sounds to me you found the perfect jolly join technique."  He's so right! I can't wait to utilize this joining technique more!


sidenote: If you know of someone else using this join technique, and/or know of its proper name, please let me know as I'd love to give proper credit.  For now, I'm going to give Mr Dee the name credit.  :)

Yarn in photo: Knitting Fever Candy Cane
Crochet Hook by Dyak.

Monday, September 1, 2014

11th Annual 60 Scarves in 60 Days Challenge!

2014 is our ELEVENTH Annual “60 Scarves in 60 Days Challengethat had originated here on my blog, www.CrochetingWithDee.com. With so many people wanting to participate it became easier to track the participants and their scarves over on Ravelry, http://www.ravelry.com/groups/60-scarves-in-60-days-challenge.


How the Challenge works:
    1. Crochet, knit, or weave a scarf (or more) for charity. You can use a pattern (give credit to the designer if that’s what the pattern calls for!), learn a new stitch, or create your own pattern. The scarf MUST be made by hand!

    2. Pledge it for a local charity near YOU; no need to ship! Check with your local homeless shelters, Salvation Armys, religious institutions, and schools to find a home for your scarf/scarves.

    3. To have your scarf count towards the goal, tell us about it on our Ravelry group; if you upload an image label it ”2014 Scarf for 60 Day Challenge.” Or post about it on your blog and post the link to the group.  You can participate as an individual, or as part of a group or Chapter.

    4. The scarf/scarves must be created by hand between September 1st and November 30th, 2014, midnight, eastern time, to count. (Yes, we know this is really 90 days, but we’re keeping the name of 60 days)

    5. Any skill level, age and gender can participate! Spread the word!
… and no, you do not need to crochet, knit or weave 60 scarves in order to be a participant! That is, unless you want to! All that is required is crafting one scarf by hand from September 1st through November 30th and then posting about it to the group. Your scarf - or scarves - are then added in with everyone else’s. Much like adding drops to a bucket; eventually it will fill up!  <3 comment-3--="">

Join in on the fun while helping YOUR local community!

Sunday, August 31, 2014

She's An American Girl

This summer I decided to travel light. This meant no bringing half my yarn stash and crochet hooks with me. In all seriousness, I had decided I would take a little vacation from crocheting.  Little did I know that it would take one of my youngest nieces to persuade me to forgo that intended break!  ((I know, what was I thinking??!!??)

My 8-year old niece said her American Girl doll needed a sweater. "Oh!," I replied, "why is that? She lives in Florida, with you. Does it get cold here?"

My niece then filled me in that when she travels on airplanes to visit other places like Colorado or Washington, or Chicago or New York, then yes, Saige, her doll, does indeed need a sweater. "And if you could make it in teal, blue, or purple, she'd really like that."


I had no idea that the two of them were such jet-setters, or that Saige was in such dire need of a sweater. When I returned home for a week I was pleased that my daughter's American Girl, Nikki, was more than happy to stand in while I constructed a couture sweater for Saige. All I had to do was promise Nikki I'd take her to LIU (Long Island University) when I went to pick up Mini~Dee from an Honor Summer Program she attended -- after all, they do have horses there.  (Nikki is the American Girl Doll that has a HUGE love of horses!)

As for me, I loved that Caron's Simply Soft *Paints* had all her favorite colors together in a single skein. The color is called "Oceana," perfect for my niece, our future Marine Biologist. And now that summer is just about over, it is time to ship this sweater off, and to make every attempt to get Tom Petty out of my head.  Enjoy! :)

Saturday, August 30, 2014

Suggestion from Reader: Try Knitting Looms

I love hearing from my readers and website visitors. While I was away over the summer taking the kids on various college tours and visits with family, I received quite a few emails from you! Thank you!

One of the emails I received was from Kate. She wrote the following, encouraging me to continue with my knitting adventures:
I enjoyed reading about your forays into knitting with needles! When I was a child, a babysitter tried to teach me to knit, but my brothers would unravel whatever I did, so I never got to learn to cast off. I gave up. A few years ago, I saw some knitting looms at a dept. store chain and bought some. I found using them to be much easier than trying to knit with two needles. I was looking for a nice way to finish off my pieces, so learned how to do a crochet edging. That began my exploration of crochet over the last few months. It was so much easier to learn, I thought, than knitting. I have done some Tunisian crochet and Cro-hooking, in addition to regular crochet. I am still very much a beginner, but enjoy learning it. I was thinking that you might like to try using the round knitting looms and the knitting boards. Knitting boards, as you may know, allow formation of an interesting two-sided fabric ("double knitting"). You can work up big blocks and lengths of fabric, which you could then surround with your lovely crochet techniques.

Kate, thank you for the suggestions. I have tried some of those knitting looms and boards, but for me, I find them a tad slow, mostly because I can't help but compare it to the speed of my crochet stitching which I have a "tad bit more" experience with. However, I do like using my Singer Knitting Machine, especially when I'm looking to craft up some fabric to do some felting with. Turning a crank to bang out several knitted stitches in mere seconds seems to be more my speed; lol. Does this mean I don't have an interest in eventually conquering my fear of the dual needles?  No. Just like with my crocheting, if I keep giving it a try, eventually the lessons will sink in. And who knows, maybe in time I'd actually grow to enjoy it!

I love that you are branching out in learning new things about crochet. Cro-hooking and Tunisian crochet are cousins, relating the worlds of crochet and knit together. Some find that after they master one or both of these crochet techniques that it is easier for them to knit. I would like to add that trying the Amazing Needle technique (now more well known as Knooking) is also a good way for crocheters to give knitting a try.  Thanks for writing in! :)

Monday, July 21, 2014

Book Review: Crochet for Baby All Year

Title: Crochet for Baby All Year
Author: Tammy Hildebrand
Year Published: 2014; printed in USA

Dee's Rating: 10 Hooks out of 10

In my last blog post I revealed the big family secret, so now that I have the baby blanket project completed it was time for me to move on to a little sweater.  So when I was asked to review Tammy Hildebrand's new book, Crochet for Baby All Year, the timing couldn't have been better!

Flipping through the book I instantly loved that the little outfits were organized by month; and that it offered more than just baby sweaters -- it also has outfits for the football enthusiasts, for Halloween, even for a day of total beachin' fun.  I decided to give the "Fall Festival Cardigan" pattern a try. The pattern calls for a variety of colored yarn but I opted to go with just two colors, blue and white. I was amazed with how quickly the project worked up.  I think I spent more time deciding which buttons to go with! (lol)
Tammy's Fall Festival Cardigans featured in her new book,
"Crochet For Baby All Year"

There are no symbol charts offered for any of the projects, but I don't think they were needed as I found her written instructions easy to follow. The project Skill Levels focus mostly on easy, but there are some intermediate patterns, and one experienced. Tammy and I both agree that Skill Level should not discourage a crocheter from trying something new: as long as you are proficient with the basics of crocheting, and diligent in counting and using stitch markers when needed.
Dee's two-color version of Tammy's
"Fall Festival Cardigan" pattern

I think this book offers a great collection of patterns for baby's first year, for both boys and girls. And since babies tend to grow quickly, Tammy's quick patterns will help ensure your project is well off the crochet hook before that next growth spurt.

Want to see more photos of patterns offered in this book?  Visit Stackpole’s Look Book here.  Want to get to know Tammy? Follow her on Facebook here.

Thursday, June 19, 2014

Hot off the Hook: Sweet Dreams Baby Blanket


With news we're expecting -- a new nephew! -- it was time to get the hook in motion to crochet something special.  I ordered the yarn and while waiting for it to arrive, I started looking for inspiration by perusing through the pattern books in my personal library. That's when I came across Silverman's pattern, "Sweet Dreams Baby Blanket."  What instantly appealed to me was a "new to me" Tunisian stitch that looked very interesting, and with it, I'd get to use my Knitter's Pride Tunisian crochet hooks with the adjustable cables. (a win-win!)

As a rule, crochet pattern books don't make my "shelf space" unless there are a minimum of three patterns (or stitches/techniques) that I think I might enjoy.  Aside from the cost/investment factor, I have an extremely limited amount of space I can store my growing "reference books" at, so this "3 pattern" rule is important to me.  I am not sure how long ago I purchased Sharon Silverman's book, "Tunisian Crochet: The Look of Knitting with the ease of Crocheting," but based upon the price sticker on the back of my book, it was during the days when Borders bookstore was still around and it retailed at the time for $24.95. (Amazon has it now for just under $19). Flipping through the pages now, I still find patterns in it that I find appealing and may return to try in the future.

Some of the changes I made to her Sweet Dreams Baby Blanket pattern included:
"Sweet Dreams Baby Blanket"
pattern by Sharon Silverman
  • Using Margaret's "Italian Cast On" method; I really like that it isn't rigid.  https://www.youtube.com/watch?v=VT_KHWDyYmY
  • Using the Knotless Russian Join technique for joining (less ends to weave in later)
    https://www.youtube.com/watch?v=dMs3GjS6o_I
  • Exchanged the first round of single crochet stitches for the edging for extended-single crochet stitches (to continue a bit with the 'knit' look) -- note that if you're going to do this, it will require more yarn. Don't be left hanging, with, say, 30 stitches to go to completion with no more yarn in the stash. This is why we should always buy a little bit extra yarn. :)
  • To soften the drape, I bumped the hook size up by one size. And since I was using the Knitter's Pride Tunisian crochet hook, when I was done with my Tunisian stitches, all I had to do was remove the cable to make it into a 'regular' crochet hook to complete the border. Sweet!!

Blocking a crocheted project is well
worth the effort.
Tip: Keeping notes on changes you've made to a pattern is important, especially if you ever find yourself needing to duplicate the work

 And, -As always, I strongly recommend blocking your crochet work. Blocking takes your completed project from looking 'Home-made' to "Hand made."  Well worth the time I assure you!  :)

Sunday, June 15, 2014

Can Giraffes Crochet? Webs says "Yes!" ...

As I stated in my last blog post, I've been crocheting A LOT of chemo caps. At my last count I had consumed some 26 skeins of yarn!  Mr Dee has shown some concern that I "might run out," but I had replied, "Like that would ever happen."  After giving my reply some thought I realised I might have missed out on an opportunity to enhance my yarn stash...

No worries there. Webs, a yarn store in Massachusetts, had announced their anniversary sale. Only, I couldn't make the sale -- I was to assist Mini~Dee in preparing for her Junior Prom.

Again, no worries: Webs must'a known. They sent me an email announcing an online sale they were having. I selected some yarn and then proceeded to complete my order.  When I came to their "Special Instructions" part of the order form I typed in:
"If you need to call, please call AFTER 12 (noon).
Please draw me a picture of a giraffe enjoying an afternoon of crocheting. :) "
The calling instructions were legit, since most mornings I've been at the hospital with Cowboy for his cancer treatments. The giraffe request -- now where did that come from??  lol   I guess that was just me being a bit silly. Never did I think that they would actually draw me a picture, never mind it being one of a giraffe crocheting!

A few days after placing my order I found myself "living" at the hospital's ER with Cowboy. Fortunately everything turned out OK, but I returned home exhausted, and in much need of some giggles and grins. That same day my order from Webs arrived. Included with my yarn goodies was a beautiful hand-drawn giraffe, enjoying an afternoon of crocheting!!  I'm not sure how often their customers request hand-drawn work, and/or if they normally fill such requests, but for this customer I can attest that it was very much appreciated; it was the lift I needed, totally making my day!  Thank you, Webs!!


Friday, June 13, 2014

The Home-stretch

It may seem as though I have dropped off the face of the earth, but if you follow me on Twitter or Facebook then you already know that isn't true. What is, is that I seem to be hanging onto the edge by my fingertips! (or, at least, that's what it feels like.)

My father, who we will give the name of Cowboy to, was recently diagnosed with cancer. His doctors are optimistic that they caught it in time. It has been my job of getting him to all his doctor appointments and radiation treatments, which has not been an easy task: Cowboy, who is as tough as an ox, is not one of those who willingly go to doctors. No, he was brought up to believe that the only reason you go to a doctor is to die. It hasn't helped that also during this time he has also been hospitalized three times with serious heart issues ... to say I am stressed is a bit of an understatement.

Fortunately, I crochet. Crochet is great for reducing stress! And I had decided at the very beginning of his treatments that I would crochet at every. single. treatment. and. doctor. visit. until I had 42 chemo caps completed. (I decided to make 42 caps based upon the number of radiation treatments he was to go through; then bumped it up to 45.)  At this time I have 45 completed with a new goal to round off the number at 50.  Each cap I've crocheted has helped keep me calm and focused, and now that we're in the home-stretch of his treatments I can only hope for the best that all these treatments will work, keeping Cowboy around to see many, many more sunsets!
Labeling Chemo Caps with Care Instructions

In the meantime, the Radiation department staff has asked if I would consider donating my chemo caps to them as their department is often overlooked -- and is in dire need of -- chemo caps.  I said yes.  I will be giving all 50 of my caps to them on the last day Cowboy goes in for treatment.  Fortunately, one of my CGOA Chapter members had some chemo caps ready for donation so I gave them to the Radiation department earlier this week. You'd have thought I was giving out bars of gold; they were so happy!  :)

Tuesday, April 29, 2014

Bloomin' Flowers: Surface Crochet'em Right On!

Spring is in the air ... flowers are a'bloomin' ...

I have lost count of how many chemo caps I now have completed (45 is my goal; one for each day my father goes in for cancer treatment. All to be donated.)  This one, is hot off my crochet hook, is crafted with half-double crochet stitches.  As I completed the last stitch for the cap I decided it needed a few flowers, and I admit: I really like how they came out.  I thought I'd share how I made them right on the hat itself!

Crocheted flowers with beaded centers make for pretty embellishment.
Bloomin' Flowers:
By Dee Stanziano

Create a slip knot, place loop on hook.

Look at your finished project. Decide where you'd like your flower to reside. Look closer at your work, more importantly, look at the individual stitch that you decided your flower will rest upon. See the legs of your stitch? Or the cross-bar from a hdc or dc stitch? These make great "loops" to directly crochet your flower onto! :)

Gently insert your hook under one of those stitch loops, yarn over and pull through the loop, yarn over and pull through both loops on hook  (this makes your 1st sc st), utilizing that same "loop" create 2 more single crochet stitches.

Turn work 180 degrees, look for another "loop" on the project to secure your flower to. Ensure it is *very* close to the prior used "loop". Make 2 single crochet stitches here, join to first sc st with a slip stitch to complete the round.

Petals: *(ch 3, dc in sc twice, ch 3, sl st in same sc st), sl st in next sc, repeat from * until you have 5 petals. End off.

Since you crocheted the flowers right onto your project, there is no need to sew them on. At this point all that is left is to weave in the tails. Adding a decorative bead to the flower makes for a great option. :)

For those fairly new to crochet, the technique of crocheting directly onto a finished project, be it crocheted or knitted, is known as "surface crochet."

Friday, April 25, 2014

Interview and Book Review: Mommy & Me Crocheted Hats

Title: Mommy & Me Crocheted Hats: 30 Fun & Stylish Designs for Kids of All Ages
Author: Kristy Simpson
Year Published: 2014

Dee's Rating: 10 Hooks out of 10


I had just vowed to crochet a chemo cap for donatation for each day I will be taking my father in for cancer treatment when the publisher of the new book, "Mommy & Me Crocheted Hats" asked me to write a review. I said yes!

Within days the book arrived and upon my initial flip-through I instantly thought the title should have been "Mommy & Me Crocheted Hats, and Some For Daddy too!" I say this because the book also includes patterns for the Dads in our lives. While this book is not intended to be "chemo" in theme, it has plenty of patterns to inspire everyone.  :)

Chemo cap inspired by "Groovy Waves Beanie" pattern
featured in the "Mommy & Me Crocheted Hats" book.
Yarn by Lotus, Hook by Graydog.
Wanting to give a pattern a test-drive, I grabbed some Lotus yarn generously given to me by Vashti, and set to work on the Groovy Waves Beanie. I found the instructions to be easy to follow (and alter, since I was using a thinner yarn and smaller hook), and liked that the instructions include sizes for Small, Medium, and Large.  I already have a second hat from the book on my hook.

I give this book a rating of 10 hooks out of 10 for the diversity of styles, ease of pattern following, and for clear how-to images of stitch instructions.

Prior to the start of my father's cancer treatments I  got a chance to interview Kristi, the author of this book:

Q. When did you start crocheting, and what was the first project you ever completed? Did you learn how to crochet from someone, or are you self-taught?
A. I began crocheting around 6 years ago. My daughter had received a 'Learn to Crochet' gift for Christmas and she sweet talked me into teaching her. As I was learning the basics to teach her....I was 'hooked'! So, yes, I am a self taught crocheter.

Some of Kristi's favorite designs
featured in her newest book.
Images used with permission.
Q. The "Mommy & Me" concept for crocheted hats is great, especially since you include patterns for Daddy too. Where did you get the inspiration for your hats?
A. "Mommy & Me" was such a blast to design. I have a sweet spot for hats, as they are my most favorite things to design. I have had sketches for YEARS, a binder of ideas that I had compiled from magazines and every day life experiences, and my publisher and I worked together to come up with a list that we thought would be great for all ages...kids to adults! For instance, I had been out to my Great Aunt's house one afternoon and she had NEW baby sheep. now, if you haven't ever seen baby sheep--you have to look up a photo. They are so cute (and even a little awkward) but their ears just get me every time! So, that was my instant inspiration for the Lamb Bonnet!

Q. I'm known for loving various crochet hooks of various manufactures. Do you find you have a favorite brand? And, how would you define your crochet style: knife holder, pencil holder, or perhaps another style?
A. When it comes to holding a crochet hook, I am a knife holder. I have seen the other styles being used, and not that one way is right or wrong-- I just can cruise right along with the knife holder style. My favorite type of hook is a generic brand from Hobby Lobby that has the bamboo on the end. I love the extra grip it gives me and I honestly do not drop my hook as much!

Q. Of the collection of hats featured in your book, is there a pattern or two that stick out in your mind as a 'favorite'?
A. If I had to pick a few favorites, I would choose the Giggles'n'Curls Hat, Downtown Slouchy, Horse hat, Pigtail Hat and the Daddy's Bearded Dude Beanie (but that's since I have to choose!---I personally love them all!)

Q. What big projects do you see in your future? ... another pattern book perhaps?
A. I am actually working on Book #3 right now! The theme is still a surprise, but I think you're going to LOVE it!
Thank you Kristi!

Kristi is the founder of Inspired Crochet magazine, and is the author of "Sweet & Simple Baby Crochet: 35 Adorable Designs for Newborns to 12 Months," published in 2013.  Additional pictures from her new "Mommy & Me" book can be found here.

Sunday, April 20, 2014

waiting and souvenirs

I was sitting in the hospital's ER, patiently waiting for the doctors and nurses to tend to my father's recent health scare. I held in my hands my trusty crochet hook and a skein of yarn; made a slip knot followed by two chains and thus began a series of seamless rounds that would grow into a chemo cap to be earmarked for donation.

The start of a chemo cap while waiting
at a wrestling match, February 2014.
I was mid-round in my stitch count when a father brought his 5-year old son into the waiting room. The boy was fidgety, tugging on his "bracelet" the hospital had given to him to wear.  "But Dad! Why do I have to wear it?!!" His dad tried to explain what the bracelet was for but the boy wasn't buying into it.  As we were the only three in the waiting room, I said to the boy, "It's a souvenir of your trip to the hospital. My son collects his. He has this many," I said as I held out my hand showing all five fingers on it.

 "He does??" the boy asked.

 "Yes," I replied, "In fact, he just got one last week when he hurt his collar bone."

"Did it hurt," the boy asked.

"Yes. My boy told me it hurt so I brought him to the hospital so the Doctor could look at it and they gave him the souvenir bracelet, just like yours."

The boy turned to his dad, held up his wrist and said, "Dad! Look! I got a souvenir!"  His dad smiled at me and mouthed "Thank you."

"What are you making," the boy asked me.

"I'm making a hat that I will give to someone who is very sick. It's what I do when I'm waiting," I replied.  "Today I'm waiting for my dad. They gave him a souvenir bracelet too."

"Ohhh, you're a very nice lady!" the boy exclaimed.

His dad told me his son had hurt himself on a trampoline and has been complaining about his "owwie" for a little while so he thought it best to be checked out.  "Dad," asked his son, "can I learn how to make a hat? His dad said yes, that he could ask a relation to teach him.

At that point the nurse called me, stating I could go see my father. As I gathered up my things the boy said, "Goodbye nice lady. I'll take good care of my souvenir!"  :)

Note: My father turned out to be (thankfully!) OK.

Friday, April 18, 2014

Crochet Sampler Dreams go Digital

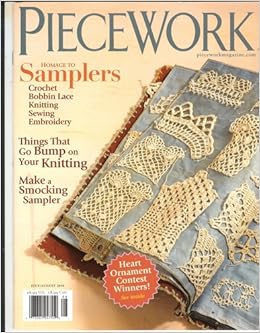
Piecework Magazine tempts me with a
Crochet Sampler cover.  August 2010 issue.
I love the idea of having a crochet sampler book. Sometimes I head over to ebay in search of one, crafted by someone who had shared the same passion for crochet. But, alas, it seems, I am not alone in wanting to own a piece of crochet's history -- I am usually outbid at staggering prices well out of my reach.

I see that I have two options: I could craft one myself, which is not a bad idea. Perhaps this is why I drool all over magazine articles about stitch sampler books such as the 2010 issue of Piecework Magazine pictured on the right.

My other option is that I can scan bits and pieces of finished projects featuring stitch patterns I find alluring, tuck them into a virtual folder, and eventually craft a digital version of a stitch sampler booklet.  Oh, I'm liking the way this sounds!  And, honestly, this is what I've been doing each time I purchase an item that has a bit of crochet on it that I like!

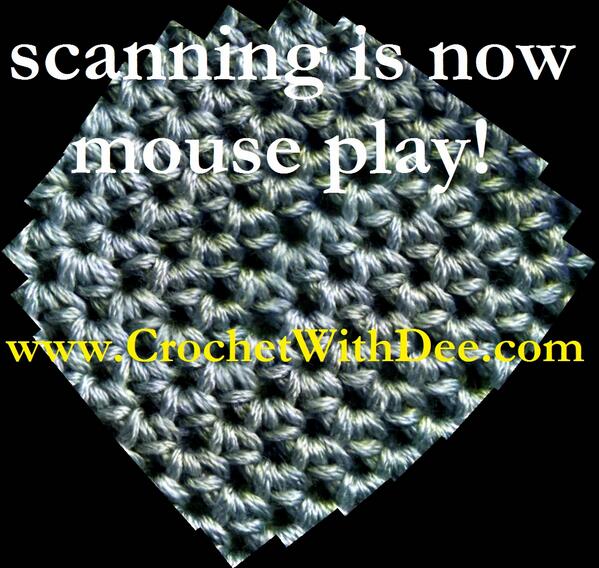
Crochet Sampler Dreams go Digital;
pictured is a sample scan of some stitch work I did on
a Chemo Cap.

This past December, while out shopping with the family, I discovered a sweet little gadget. The sales associate was quick to point out that there would no longer be a need for me to turn on my all-in-one-printer, wait for it to warm up, scan it into my computer, rename the file, and then edit it. No. This little gadget fit right into the palm of my hand and could easily scan bits and pieces, as well as full pages ...  whatever he said after "bits and pieces" was lost to me. He had said, "Bits and pieces." Would it, could it, scan crochet and knit fabrics?  I asked. He didn't know. I pulled out my gloves out of my coat pocket, laid it on the counter and moved the mouse over them. It worked!!  Ohhhh, I so wanted to purchase this little mouse right there and then. But I didn't. Instead I grabbed my Santa's hand and pointed, and said, in direct words, "Me. Want!!"  I don't think Santa took good notes last year because it wasn't under the tree.  Trust me, I LOOKED!!

Moving the story along, I purchased the sweet little gadget this week -- and mind you not at the December retail ($99), but rather at the April sales price of just $38.  That's a whole'lotta savings I can use to enhance my yarn stash!

One of, if not the best reason, I really love my new toy, is because with the stitches scanned, I can zoom right into to the stitch work I want to study. It doesn't have to be actual stitch work I've already completed. It can also be a picture of a project from a publication, that perhaps I want to see more of -- perhaps on how it was constructed, or to help clarify written stitch instructions. I'm so excited to add this product to my "tool belt."  :)

Friday, April 4, 2014

Book Review: The Fine Art of Crochet

Title: The Fine Art of Crochet
Author: Gwen Blakley Kinsler
Year Published: 2013

Dee's Rating: 10 Hooks out of 10

"...crochet as a means of expression" can be "...composed in one piece and, like pottery and glassblowing, can be fluidly molded..." ~Clinton MacKenzie

To think that if the author Rose Wilder Lane (daughter of Laura Ingalls Wilder) was reportedly amazed to find "American Crochet" (aka 'granny squares') during one of her visits to a museum in Europe, I can only imagine what she would think of the diverse collection amassed in Gwen Blakley Kinsler's new book, The Fine Art of Crochet.  Twenty artists whose crochet work is on the cutting-edge in modern times were selected for their wonderment and inspiration that is not bound by gender nor by financial constraints.

Gwen's book is her tribute to crochet; she is the Founder of the Crochet Guild of America, and has been creating her own inspirational crochet art since 1982. To help us become unstuck on the "crochet is stiff" and "only women do it" thinking, Gwen shares the history of crochet from the 1960's to today to show us how it has evolved as an extraordinary art form.  As each of the twenty featured artists are introduced in this book, the reader is given the experience usually reserved for visits to the museum. Gwen even features the work of one artist, Jerry Bleem, who creatively redefines the "American Crochet" by using plarn (yarn made of recycled plastic bags) in one of his pieces!

Each of the twenty artists listed below were selected to provide a fresh look at crochet which includes four men: Arline Fisch, Leslie Pontz, Georgina Valverde, Pate Conaway, Carol Hummel, Renie Breskin Adams, Donna Lish, Dale Roberts, Nathan Vincent, Andrea Uravitch, Kathleen Holmes, Tracy Krumm, Donna Rosenthal, Karen Searle, Soonran Youn, Jerry Bleem, Jo Hamilton, Yvette Kaiser Smith, Bonnie Meltzer, and Dr. Carol Ventura.  The textures, the shapes, the techniques and the various mediums used are all part of this stunning and inspirational collection of crochet art!. If you are interested in exploring crochet outside of its traditional roles, then this is the book for you.   Bravo, Gwen!  Bravo!
Myra Woods showing the International Freeform Crochet Group's
collective work; image from my 2007 blog entry,
"Oh, Those Freeformers!"


Note: Gwen even includes some history behind a collective piece of work by members of the 
 International Freeform Crochet Group which I am proud to state I contributed to. (see image above)

Thursday, January 16, 2014

The Wonderment of Miniature

rare black Boye WWII Crochet Hook, Silk sewing thread
I am venturing, for my first time - ever, down that famous bunny hole, entering into the world of Alice in Wonderland.  I am talking about where things are big, and things are small, and thinking of impossible things are indeed quite possible.
“Alice: This is impossible!
The Mad Hatter: Only if you believe it is.”
             ~ Lewis Carroll

I'm talking about Miniature Crochet.

I have crocheted with thread before, in crocheting doilies and Irish Crochet projects and such. But I have never, other than admiring other people's amazing work and purchasing the book on Miniature Crochet, ventured any deeper into the world of miniatures.


zooming in...doily pattern can be found in the book,
Doilies in Color
Still working on my comic newspaper doily for my CGOA's Chapter's "Hello Doily Challenge," I decided it would be fun to also have a tiny version of the same doily crocheted in sewing thread.  You know, as a comparison of big and small, paper and ____.  Paper and silk! I purchased a spool of silky sewing thread that changes color.  Once I was home, I grabbed one of my black World War II Bates crochet hooks (size 10/ 1.5mm) and set to crocheting my beginning chains required by the pattern.

Let me state that it was at that very moment I felt like Alice as she started tumbling down that rabbit hole!  I was lost.  I couldn't see my stitches, and the thread was so darn slippery!  Had I read this excellent blog post on Choosing Threads first, I think I would have chosen a different thread to start this journey with! 

I would also recommend getting something to magnify -- such as a good pair of glasses -- as well.  I located two pairs of glasses (2.0 and 1.5 magnifying glasses) and can now turn the impossible into the possible if I wear both glasses at the same time.  (The next time I venture out to the store I'll pick up a single pair of strong magnifying glasses that can do the job of both.  Unfortunately, the magnification is also pointing out that I am in need of a manicure -- add that to the list of recommendations.)

I am now several rows into this miniature world, and I must admit that I am enjoying this adventure.  :)

--------------------------------------------

Want to know more about the hard-to-find WWII Black Boye Crochet Hooks?  Visit http://hooklady.blogspot.com/2010/12/another-rare-boye-hook.html


Friday, January 10, 2014

Book Review: Crochet Wraps Every Which Way


"Crochet Wraps Every Which Way" by
Tammy Hildebrand
Title: Crochet Wraps Every Which Way
Author: Tammy Hildebrand
Year Published: 2014; printed in USA

Dee's Rating: 9.5 Hooks out of 10

Tammy writes in her book Introduction:

"Is there anything more versatile than a wrap?  One of the most long-lived garment designs in existence, a wrap can be anything from a light, lacy shawlette, to a thick, cozy poncho, to a huge, intricate, jaw-droppingly gorgeous lace shawl."

She is so right! And the timing of her new book couldn't have been better, especially with the Bridal, Prom and Graduation seasons right around the corner! What could be better than wearing a hand-crafted shawl to such occasions? :)

Tammy's "Aqua Marine" from her new book,
"Crochet Wraps Every Which Way"
© 2014 by Stackpole Books. Used with permission

In this hot-off-the-press book, Tammy offers 18 original patterns, which includes 6 crochet techniques that range from traditional crochet to double-ended crochet.  The project Skill Levels rotate from easy, to intermediate, to experienced. This means there are six patterns offered with each of these 3 skill levels -- offering something for everyone to try!  Thinking inline with Tammy again, I do not agree with judging a pattern by the Skill Level as it could discourage a crocheter from trying something new: as long as you are proficient with the basics of crocheting, and diligent in counting and using stitch markers when needed, then you are ready to crochet up one of her beautiful wraps!

And I know this first hand -- as I type this book review, I already have her "Aqua Marine" wrap fresh off of the blocking board! Not only did this project work up super quick, but I also found Tammy's instructions easy to understand - and adapt! (Hey, she does say in her Introduction to "Have fun, experiment.")


My version of Tammy's "Aqua Marine" pattern
worked up as "Amethyst."
There are no symbol charts offered, but as I already stated, I found her written instructions easy to follow.  The only reason this book lost "half a hook" in my rating is due to some of the photography being blurry -- I am not sure if it is just my book (perhaps a printing mishap?*).  I do want to state that the images in question that I found to be blurry do not distract from the quality of the projects being offered: meaning I'd still want to add this book to my private crochet library!

* ETA: In an email exchange with the publisher, they report that the images look fine in their copies of the book.  So perhaps the issue is only with my copy.  

Want to see more photos of patterns offered in this book?  Visit Stackpole’s Look Book here.  Want to get to know Tammy? Follow her on Facebook here.  My Amethyst project details can be found here.

Saturday, January 4, 2014

A "How To" - Peacock Garment Closure

Create your own pretty "Peacock Garment Closure"
If you are anything like me, you yarn shop AND shop for buttons, tassels, and beads too.  But not necessarily at the SAME time, or with a project aways in mind.

Sometimes inspiration hits. We go stash diving, find the perfect yarn and pattern combo and then begin happily stitching away. Then, once the project is done, we consider "the closure..."

So we head to the stash of buttons to find we do indeed have the perfect button, but then realize the project lacks button holes!  What to do? What to do!

An easy fix! We create a "Peacock Garment Closure."  Which is very pretty indeed!

You will need:
1 large button (the pretty one)
1 smaller button (used as a stabilizer)
2 pretty tassels, beaded ones optional
a sewing needle.

Instructions:
1. Sew the pretty button on the front of the project, with the smaller (stabilizer) button on the backside with the project "sandwiched" in the middle.
2. On the other front side of the project, sew the tops of the two tassels together so that they can dangle freely.

To use:
1. Take one tassel and loop over the button.
2. Take the other tassel and loop around the button in the opposite direction.

Now not only do you have a super pretty closure, but also more inspiration to enhance your button, bead and tassel stashes.  :)

Wednesday, January 1, 2014

Happy Cro-tastic New Year!!

Can you believe it?  Today is the start of a brand New Year -- and, in just a few short weeks, it will also be the official 10th Anniversary of my blogging (mostly) about crochet.  TEN YEARS!!!  What a milestone!!  The yarn, the hooks, and the projects!  The classes, conferences, and sheep & wool festivals!  Wow!!

To celebrate, I'll be awarding one lucky reader a one-year membership to the Crochet Guild of America: a year of opportunity, possibilities, and discoveries!  I've been a member since 2001, and I can tell you I have enjoyed every moment of it. ... So, not only is it my blogiversary, but the CGOA will be celebrating their 20th ANNIVERSARY!!  What an exciting year this is going to be!!!  :)

For those interested in helping me celebrate and want a chance to win the CGOA Membership, the rules are posted below.  Please note one entry per person, and the drawing for the 1-year membership is open to everyone of adult age.  (If you're not sure if your country is open to the CGOA Membership, you can contact the CGOA to inquire prior to entering.) 


>>>  EDITED 2/1/14: GIVEAWAY is now CLOSED.  Winner TBA in future blog post.  <<<
The Rules:
1.  Dive into my blog archives and find a post that you like.  An easy way to find a topic that might interest you is by utilizing the "search" option in the upper left-hand corner. You can search for a technique, a hook, a project, a yarn, a book review, famous crocheters and more!
2. Once you've found on you like, right-click onto the title, click onto "properties" and grab the address to that post.
3. Come back here and leave a comment stating "This is a post I liked: (insert the post address by right-clicking again and pasting the post address)."

Example: one of my favorites from my archives is http://crochetwithdee.blogspot.com/2004/09/that-my-mom-she-famous.html

If you comment on why you liked the post, then you will get two chances of winnng the membership.
4. Leave a way for me to be able to contact you should you be the winner.  If I can't reach you, I'll have to pick someone else.
5. Note that this is for the CGOA Membership, and is not exchangeable for actual cash.
6. Yes, even if you're already a CGOA Member, you can participate. Should you win, it will be more like a Renewal.

Good luck, happy post hunting, and may your New Year be Cro-tastic!  :)www.crochet.org